Many laptops are now available with a dual graphics card, namely an integrated graphics card (Intel) and an additional dedicated graphics card (NVIDIA or AMD).
Problems can often arise when your applications need to use the dedicated graphics card. The default option on the laptop can be set on «Auto». The system will decide which GPU can be used for a specific application. This can be a problem for many applications. We must then be able to configure the graphics driver to use the dedicated GPU to improve video performance.
A photogrammetric modelling application such asiTwin Capture Modeler (Formerly called ContextCapture) makes it possible to take advantage of the graphic card in order to make parallel calculations so as to obtain a result as soon as possible. A correct setting of the graphics card parameters is therefore necessary even if the initial proposals are generally correct.
Here we will explain how to change the parameters of the switchable graphics cards. These steps vary from computer to computer, but here is a general framework on how to proceed.
Steps to Solve
Right-click on your desktop and select Graphic properties. This will open the Control Panel Intel Graphics and Media.
Then click Advanced Mode and OK.


In the next window, click on the 3D tab and set your 3D preferences to Performances.
Note: If, at the end of this process, the application still fails to run correctly, also disable the "Optimal Application Mode".
Click Apply.

Now select the Power tab and set the power management modes for maximum performance. If you sometimes work with your battery-only laptop, select Battery in the bottom right corner and set it to High Performance.

Close Control Panel Intel Graphics. Click again with the right mouse button on the desktop. This time, select the configuration panel of your dedicated graphics processor (usually NVIDIA or ATI / AMD Radeon).
NVIDIA graphics cards
For cards NVIDIA, click Adjust image settings with preview. Then select Use advanced 3D image settings and click Apply.

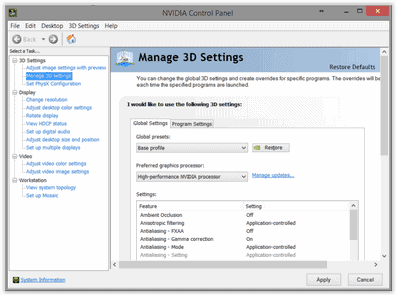
Click Manage 3D settings and open the global settings drop-down menu.
Select the high-performance NVIDIA processor as the preferred graphical processor, then click Apply.
Open drop-down menu Parameters programme. Now search your application in the list or, if it is not, click on Add.
Look for your application (for example, C: Program Files Bentley ContextCapture Center bin CCMaster.exe) and double-click it to select it.

Click Set the PhysX configuration, open the drop-down menu and select your card NVIDIA (name depends on your exact card) as a processor PhysX. Click Apply and you're done.
Restart the application. If you still have problems, you may have to go to www.nvidia.com (do not use) Windows Update) and download the latest drivers.

ATI / AMD Radeon Cards
NOTE: There is a large variation in the ATI / AMD Radeon Catalyst control centre versions for setting the parameters of these cards. Therefore, We have to consider the following elements as indicative as well as actual.
Even if your Control Centre is different from these images, the principles are the same and you should be able to find options similar to those described here.
For ATI/AMD Radeon cards, access Graphs > PowerPlay – Define the performance of Plugged In and battery.
Click Apply.

If this applies to your graphics card, go to Graphics > 3D and move the cursor to Performance to settle it on Optimal Performance.
Click Apply.
NOTE: This function may not be available on all ATI models.

If your Catalyst Control Center has tab Switchable graphs, access it and search for your application (e.g. C: Program Files Bentley ContextCapture Center bin CCMaster.exe) and set it on High performance.
Click Apply.

Restart your computer and application. If the problem persists, you may need to visit the site www.amd.com (do not use) Windows Update) and download the latest drivers.